Configuring and selecting AI engines
Striim AI uses large language models for sensitive data governance, to generate vector embeddings, and to run Striim CoPilot. Striim's default Striim AI engine is based on the open-source Microsoft Presidio.
If you are already using OpenAI or Vertex AI, you can use them as AI engines for Striim AI. See Using an OpenAI or VertexAI engine.
You can set up multiple AI engines in Striim. You can find the list of your AI engines for the Striim AI features as follows:
In Vector Embeddings Generator from the Striim AI menu.
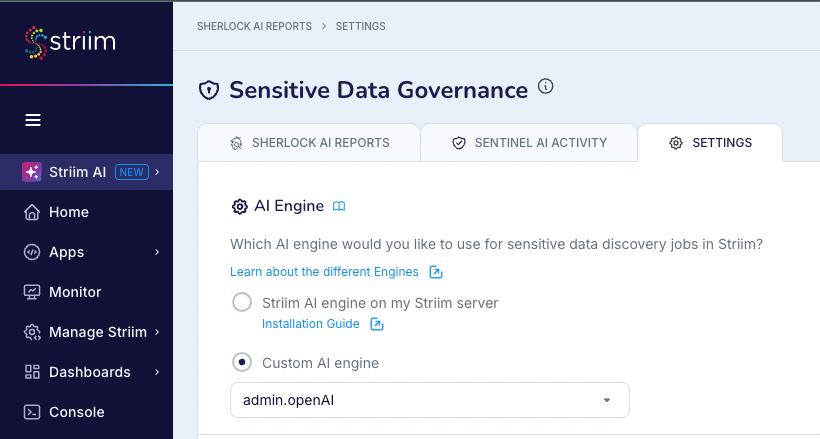
In Sensitive Data Governance, in the Settings tab.
Using the Striim AI engine
The following are required for the Striim AI engine:
A minimum of 16GB of RAM.
Docker Desktop installed and running.
40GB of free disk space available in Docker (in Docker Desktop, see Preferences > Resources > Disk image size).
To install Striim AI:
In a terminal or command prompt, pull the Docker image from Docker Hub.
docker pull striim/striimai:latest
Run the Docker image.
docker run -d -p 9000:9000 striim/striimai:latest
If the machine has GPUs, include
--gpus all.docker run -d -p 9000:9000 --gpus all striim/striimai:latest
By default the image uses port 9000. If necessary you may map to a different port (in this example, 9001):
docker run -d -p 9001:9000 striim/striimai:latest
If you didn't use the default port 9000, or the Docker container is not running on localhost, edit startUp.properties, change StriimAIServiceAddress to the correct IP address and port, and restart Striim. For example, for port 9001 on localhost:
########################## #
Striim AI Settings
##########################
StriimAIServiceAddress = localhost:9001
You can also add multiple servers as follows:
StriimAIServiceAddress = localhost:9000,localhost:9001
Look in the Docker Desktop Dashboard and make sure the Striim AI container is running (it may take a few minutes to start). Once it is running, you can use Striim's AI features.
If you move Striim AI to a different IP address or port, enter the following command in the Striim console to update the Striim AI connection profile:
CREATE OR REPLACE CONNECTIONPROFILE System$PIIGlobal.striimAICP type striimAICP
  ( striimaiserver: 'localhost:9002'; );
Using an OpenAI or VertexAI engine
To configure a custom OpenAI or Vertex AI engine:
In the Striim AI menu select Sensitive Data Governance.
Select the Settings tab. The default engine is Striim AI engine on my Striim server.
Select Custom AI engine and select New.
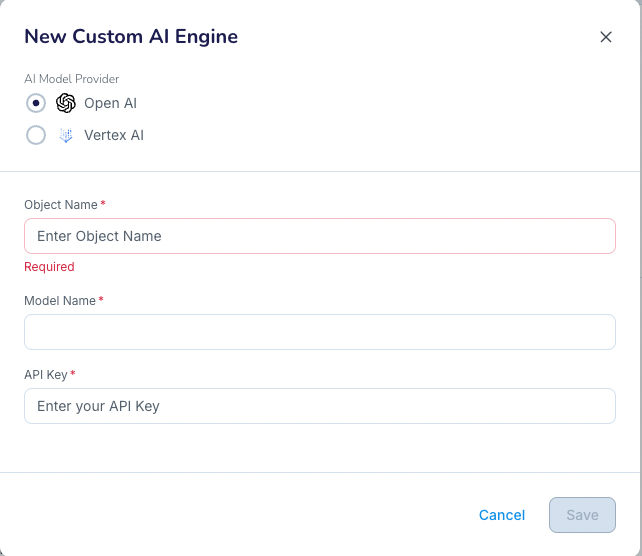
Choose OpenAI or Vertex AI as the AI model provider.
Configure the following settings:
For OpenAI:
Object name
Model name
API key
For Vertex AI:
Object name
Model name
Project ID
Service account key
Region
Publisher
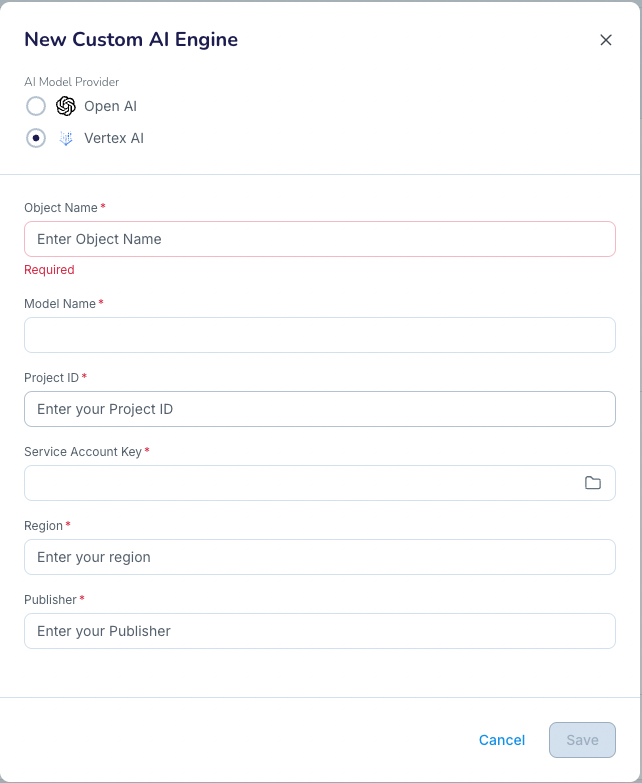
Click Save.
You can now select the engine from the Custom AI menu for sensitive data discovery.
Limitations on engine selection
The following are limitations on engine selection:
If you change the AI Engine settings, it may impact the usages of Sherlock AI and Sentinel AI that are currently running and that use the AI Engine. You can create a new AI Engine and use it for a new Sherlock AI or Sentinel AI use. If you want to modify the AI Engines that are used by active Sherlock and Sentinel AI Agents, you must perform the following:
Wait for any active Sherlock AI report to complete.
Stop and undeploy any running application that contains a Sentinel component that uses the AI Engine.
Modify the AI Engine settings.
Launch new Sherlock AI reports and applications that contain Sentinel AI.
When using Vertex AI with sources that contain tables that have more than 10 fields, it is possible that Striim may hit Vertex AI's token limit exceeded exception.